Contents
- 1 Everything You wanted to know about Lawn Care but didn’t know who to ask
- 1.1 Grass Climates
- 1.2 What kind of Grass should I get?
- 1.3 Lawn Seed from the ground up
- 1.3.1 The keys to starting with seed
- 1.3.2 Good seed doesn’t cost, it pays
- 1.3.3 Understanding a seed label
- 1.3.4 “Fine textured” and Coarse”
- 1.3.5 Percentages
- 1.3.6 “Crop” and “Weed” seed
- 1.3.7 Noxious weeds
- 1.3.8 Straights, mixes and blends
- 1.3.9 Measures of extra-quality seeds
- 1.3.10 Germination to establishment: how long?
- 1.4 Your new Lawn
- 1.4.1 Ten steps toward a new lawn
- 1.4.2 Watering
- 1.4.3 How often should a lawn be watered
- 1.4.4 Watering during drought
- 1.4.5 How much water does a lawn need?
- 1.4.6 What time of day should the lawn be watered?
- 1.4.7 Watering new Lawns
- 1.4.8 Portable sprinklers
- 1.4.9 The container test
- 1.4.10 Get to know your lawn
- 1.4.11 Developing a water-efficient lawn
- 1.4.12 Underground irrigation
- 1.5 Installing a seed lawn
Everything You wanted to know about Lawn Care but didn’t know who to ask
We think our website will be more useful to you than any other resource about lawns. Why? Who knows more about the finer points of lawn growing in Florida, for instance, than an experienced individual living there? Your climate is the single greatest factor to influence lawn growth. Climate determines whether Kentucky bluegrass or bermuda grass (or both) will thrive In your front yard. It dictates the right times to fertilize, water, and when crabgrass germinates. Diseases and weeds that are rampant in one climate are rare or nonexistent in another. To find out just what kind of information people wanted ,we conducted an extensive survey of lawn growers and nurserymen in every part of the country, They told us of the importance of knowing the “how and when” of lawn growing, “Be regional and practical,” they said. Their most common questions are discussed in the section “Questions …questions …” The lawn survey told us, to no great surprise, that people care about their lawns. Many homeowners projected an unabashed pride in being able to grow a handsome lawn. We discovered that, for most. the lawn is not just a hobby. Lawns are different things to different people – a soft playground for the kids, or a pleasant backdrop for the landscape. Maybe it’s the soothing color or the uniform texture that induces a lawn’s appeal, Whatever the attraction, a well-kept lawn does possess a certain mystique.
Many to thank. Without the Cooperative Extension Service offices of each state and their helpful workers, a task of this scope would not have been possible. Numerous individuals in the nursery, turf, and lawn maintenance business guided us toward the answers to everyday questions and problems that are commonplace to them. To these many professionals, we express our appreciation.
Grass Climates
Grasses are categorized as either cool season or warm season according to their characteristics. Many warm-season grasses are adapted to the southern part of the United States. They grow vigorously in the warm summer months and then go dormant, turning brown with cold weather. Although better adapted to high temperatures, warm-season grasses usually aren’t as hardy as cool- season grasses. Common warm-season types include bermuda, bahia, centipede, St. Augustine and zoysiagrass.Buffalograss and blue grama are examples or warm-season grasses that can take colder climates.
Cool-season grasses are the grasses of the North. They grow actively in the cool weather of spring and fall, then grow slowly in summer heat but will remain green with ample water. Although they are primarily grown in the North, they are also valuable in higher elevations of the south. In parts of the country with winter snow cover, active growth is in the spring and fall. Kentucky bluegrass, fescue, bentgrass, and ryegrass are cool-season grasses.
What kind of Grass should I get?
The number one question that people ask is what kind of grass can I grow in the Tampa Bay area. There are five types of grasses that are best suited for Florida’s climate. They all have strengths and weaknesses some are shade tolerant and others require full sun exposure. If you want to keep a low watering bill, you should choose a grass that is drought resistant. Here are the choices:
Centipede grass
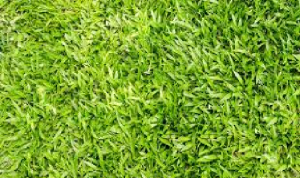
Strengths: Makes a good, low maintenance, general purpose lawn. Adapts the poor soil. Aggressive enough to crowd out weeds. Needs less mowing than most grasses. Resistance to chinch bugs and rhizoctonia provides an alternative to St. Augustine grass.
Weaknesses: Coarse textured. Color is not dark green. Tends to Yellow from chlorosis. Sensitive to low temperature.
Shade tolerance: Fair.
Watering needs: Shallow root system is sensitive to drought but recover is fast.
Fertilizer needs: Low, 3 lb of actual nitrogen per 1000 square feet per year.
Wear-ability: Not too good. Recovers slowly from damage.
Zoysiagrass
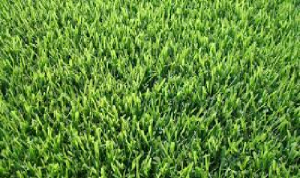
Strengths: Forms dense, fine textured lawn, resistant to weeds. Good heat and drought tolerance. Relatively free of disease and insect pests, though chinch bugs May bother it.
Weaknesses: Very slow to establish. Does not thrive where summers are too short or too cool. Wiry blades tough to mow if left too long. Tends to build thatch..
Shade tolerance: Slow in shade but much better than Bermuda grass.
Watering needs: Good but needs more than Bermuda grass.
Fertilizer needs: Medium. Between 4 to 6 lb of actual nitrogen per 1000 square feet per year.
Wear-ability: Good.
Bermuda grass

Strengths: Likes heat, easy to grow in most soils, takes considerable abuse. The most widely adopted warm season grass. Tolerates little maintenance but makes a handsome lawn when given Extra Care.
Weaknesses: Invasive, poor shade tolerance, often browns in fall until spring.
Shade tolerance: Poor.
Watering needs: Very drought tolerant but needs extra water in dry periods to look good.
Fertilizer needs: Moderate-to-high 4 to 8 pounds per year per 1000 sq ft.
Wear-ability: Outstanding.
Bahia grass
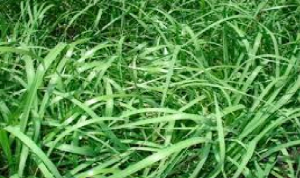
Strengths: Low maintenance. Extensive root system valued for erosion control and drought resistance. Moderately aggressive.
Weaknesses: Forms a course, open lawn. Tall, fast growing seed stalks need frequent mowing to remain attractive. Considered a weed in fine lawn. Maybe turn yellow from chlorosis. Dollar spot and especially mole cricket may be a problem.
Shade tolerance: Fair to pretty good.
Watering needs. Good drought resistance, but performs best where rain is plentiful and evenly distributed over the season.
Fertilizer needs: Medium, about 4 to 6 lb of actual nitrogen per 1000 square feet per year.
Wear-ability: Good.
St. Augustine grass

Strengths: Easy to grow, robust. Good shade grass. Tolerates salty soil.
Weaknesses: Very susceptible to several diseases during long rainy periods. Chinch bugs have killed many San Augustine grass lawns. Tends to thatch badly.
Shade tolerance: One of the best.
Watering needs: Medium-high, needs frequent watering.
Fertilizer needs: Give about 4 to 6 lb of actual nitrogen per 1000 square feet per year.
Wear-ability: Poor.
Lawn Seed from the ground up
Seed is the most common way to start a new lawn. Years ago what was swept from the barn could be scattered around the yard and eventually, a lawn would grow. This casual and haphazard approach has been superseded by its very sophisticated industry that supplies around a hundred twenty million pounds of lawn seed to grow turf each year. Of the millions of pounds of seed produced Kentucky bluegrass. It is the most widely adopted grass of North America. Common Bermuda grass is also planted in large quantities with fine and tall fescue and the rye grasses being the other important lawn seeds.
Seed is a popular method to start lawns, partly because its economical. Computing the total expense of a new lawn, the seed is usually no more than 5% of the total cost. See quality is important. Quality seed is healthy, with a high percentage of germination. It is also weed and disease-free. A few more dollars for 5 lbs of the highest possible quality seed for example, can save hundreds of dollars in the years ahead. You’ll have fewer weed and disease problems and will generally have a higher quality lawn.
The keys to starting with seed
Experience has shown that the type of seed you select is very important. Make sure the grass type and variety are adapted to your area. Read the label on the seed container carefully. Prepare the soil well and ensure good contact between the seed and the soil when planting. Sow the seed at the time of year most favorable to germination. Keep the new seedbed moist until after germination. Be certain you have the answers to the most important questions before you purchase to seed.
Will your lawn be used primarily for decoration or for recreation?
Which grasses are best adapted to where you live?
Will the lawn be partially shaded or receive full exposure to the sun?
How much time and energy are you willing to put into your lawn care?
These questions may seem obvious, but they are very important considerations.
Good seed doesn’t cost, it pays
Although some aspects of lawn seed production are under state and federal regulations, the seed producers desire for quality is the only sure guarantee of good seed. But by knowing how to read a seed label, many comparisons can be made that will help you make a better decision.
The variety of boxes and containers of lawn seed available in most garden centers and hardware stores can make selecting lawn seed a bewildering experience. Besides the color and size of the box and a brand name, there is no way to compare value other than reading the label.
Seed box labeling is government regulated. The Federal Seed Act of 1939 determines the basic structure of seed labels. Many individual states have their own seed labeling laws but any variance from the federal standard is usually insignificant.
There is no real mystery to seed labels, but because of government regulations and the ease of a technical vocabulary, they can be difficult for the casual or beginning gardener to understand. The labels are a legal document each word has a specific meaning.
Understanding a seed label
Most commercial mixes will tell you how much seed to use and sometimes when to seed. Some will indicate the spreader setting to use.
The spreader setting is merely a guide, although usually an adequate one. A statement like “enough seed for 1,000 square feet of new lawn” is better. You then know how far the seed will go, regardless of how you intend to spread it.
Experts have determined how many seeds per square inch are best for new seedlings. These rates will vary according to many factors, such as the seed size and growth habit of the grass. But most lawns get a good start if seeded at a rate of approximately 20 seeds per square inch – just less than 3 million seeds per 1,000 square feet. These figures certainly are not intended to be precise and only serve as a example. Some quick multiplication will show that 3 million seeds per 1,000 square feet is the same 1 ½ pounds of Kentucky bluegrass per 1000 square feet or 5 lb of fine fescue over that same area.
It is interesting to note that different varieties of the same type of grass will vary and seed size. However, the difference is inconsequential when determining application rates. For example ‘sysdsport’ Kentucky bluegrass has 1,800,000 seeds per pound while ‘Birka’ has only 1,380,000 seeds per pound.
Naturally quantity recommended to sow is based on average conditions. If you expect a lot of seeds to be eaten by birds or otherwise fail to survive past termination, Sow at a heavier weight. But seeding heavily just to be generous is not always a good idea. Grasses planted too close together will produce weaker plants that are slower to mature.
“Fine textured” and Coarse”
The fine-textured grasses are the backbone of a high quality lawn seed mix. Kentucky bluegrass and the fine fescues are the most important fine textured types.
Bent grasses are also considered fine textured. At one time, they were a component of all quality mixes. They are soft and their narrow leaf-blades qualify them as fine textured, but because of their different growth habit and management needs, they do not mix well with Kentucky bluegrass, fine fescue, or turf-type perennial rye grass. They form unattractive clumps in a bluegrass lawn if the lawn is mowed high. Mowed low, the bent grass will eventually predominate anyway because the others will be crowded out. Alone and properly cared for, the bent grasses can make a handsome lawn.
Blue grasses other than Kentucky types (Poa pratensis) are also legally considered fine-textured. Rough-stalk bluegrass (P. trivialis) is found in some shady lawn mixes. Bermuda grass is also listed as fine-textured. All other grasses must, by law, be listed as “Coarse.”
Specifically, the coarse grasses are tail fescue, meadow fescue, redtop, timothy, and both annual and perennial rye grass. However, considering the rye grasses in this category is a bit problematical. It is true that annual and common perennial rye grasses are wide bladed, clump forming, coarse grasses. But the new varieties of perennial rye grass, called “turf types,” are as fine-bladed as Kentucky bluegrass. These turf-type ryes are premium quality lawn grasses, some labeled as fine-textured, others unfairly labeled as coarse. Thus, it is that the term coarse can be misleading, and can cause problems. If you know something about the seed in the box and its potential, you can be the best judge.
Percentages
When the label says that 60% of a given mixture is Kentucky bluegrass and 40% is red fescue, it means 60% and 40% by weight of the contents. If the meaning of this is not apparent, take a look at “Seed facts.” Note that there are usually over 2 million seeds of Kentucky bluegrass in a pound, and approximately 600,000 seeds per pound of red fescue. When you plant a mixture labeled as 60% Kentucky bluegrass and 40% red fescue, in actual seed numbers you are planting 84% bluegrass and 16% red fescue. A red fescue seed weighs three times more than a seed of Kentucky bluegrass. The actual contents of a seed mixture would be more apparent if the percentages were in seed counts, rather than weight.
Germination percentages let you know how many of each seed type will germinate under ideal conditions as of the test date. By multiplying the percent germination and the percent of the grass type in the mixture, you can determine how many seeds of that type have the potential to grow. This is called “percent-pure live seed.” This percentage is not listed on the label, but it’s one way, although complicated, to figure the real value of the seed before purchase.
Let’s go back to our sample of 60% bluegrass and 40% fine fescue mixture. If the germination percentage of the bluegrass is 80%, then 60% multiplied by 80% (..60 x .80) equals the percent-pure live seed of Kentucky bluegrass. Usually 90% of the fine fescue will germinate. So, 90% multiplied by 40% equals the pure live seed of fescue in the mixture. In these terms the mixture is actually 48% Kentucky bluegrass and 36% red fescue. Obviously, as the germination percentage goes down, you are buying less viable seed. If a container of seed is unmixed and unblended, it will list the percent ‘purity.” Essentially, this has the same meaning as the percentage of grass types in a seed mixture mentioned earlier. A box of straight Kentucky bluegrass should be at least 90% pure. Again, by multiplying the percent purity by the germination percentage, you can determine how many viable seeds are in the box, thus the value of the seed. Percent-pure live seed is a good way to compare value but is not the only measure. In terms of the label, judge quality primarily by comparing percent germination, percent weed and crop seed, and the occurrence if any, of noxious weeds.
“Crop” and “Weed” seed
Plants that are considered crop and those considered weeds are distinguished by agricultural laws of individual states. Keep In mind that labeling laws were designed for farmers, not buyers of lawn seed, That’s why some of the most serious lawn weeds may not be listed under “Weeds.” Timothy,orchard grass, tall fescue, and brome grass — all serious lawn weeds — are usually classified as crop. Just 1 % of a weedy fescue can contribute 10,000 seeds to every 1,000 square feet of new lawn. Both timothy and redtop have small vigorous seeds. A small percentage of these can produce many established weeds in the new lawn.
Consider likewise, the percentage of weed seeds. The percent could represent a few large, harmless weeds, or many serious light weight weed seeds. The quality of the producer is the only standard to judge by. At a 0.27% weed percentage, for instance, a homeowner can plant 30 unwanted chickweed seeds per square foot.
Noxious weeds
These weeds are often difficult to eliminate once they’re established. Many spread just as aggressively with runners or bulbs as by seed. Each state will have a list of weeds considered noxious,
The specific noxious weeds as set forth by the Federal Seed Act are: whitetop (Lepidium draba, Lepidium, repens, Hymenosphysa pubescens); Canada thistle (Cirsium arvQnse): dodder (Cuscuta sp.); quackgrass (Agropyron repens); johnsongrass (Sorghum haiepense); bindweed (Convoulus arvensis); Russian knapweed (Centaurea picns); perennial sowthistle (Sonchus arvensis); and leafy spurge (Euphorbia esula). These are primarily field crop weeds, but a few are serious lawn weeds.
Annual bluegrass (Poa annua) and bermuda grass are noxious weeds in a few states. If present in a seed mixture, noxious weeds must be named and the number of seeds per ounce shown. In a quality seed mixture, there should be none.
Straights, mixes and blends
The word “straight” is used to describe lawn seed composed of just one type of grass Many warm season lawns are unmixed and unblended with other grass types, Lawns of common or improved bermuda, St. Augustine, or zoysia grass are examples. Tall fescue and bent grass are cool-season grasses that are sometimes used alone. For most cool- season lawns, a mixture or blend is preferred.
A mixture contains different varieties of seed which adjust individually to the varying soil conditions and sun or shade areas of typical lawns. The strength of one grass type compensates for another’s weakness. A lawn of a single variety of Kentucky bluegrass could be wiped out if a potent disease swept through. With considerable amounts of fescue or rye in the lawn, the effect of the disease is lessened.
As in the past, a little bit of everything was thrown into a bag of lawn seed. It was the shotgun approach – growers weren’t too sure what was going to work so a little of everything was tried.
Also, some still speak of the “nurse grass” in a mixture. The idea of a nurse grass, disregarded today, is that a hardy, fast-growing grass makes the way a little easier for the slower, more delicate premium grass. We now know the fast grasses actually compete too much with the others and slow establishment of the premium grass.
The grasses that mix together best will have similar color, texture. and growth rate. They will be roughly equal in aggressiveness. The most important grasses that are similar in these respects are Kentucky bluegrass, fine fescue, and the turf-type rye grasses. Seed formulators vary the relative amounts of these ingredients and sometimes add small amounts of other grasses, depending upon the
intended use of the mixture. For instance, more fescue will be added if the lawn will be partly shaded or if the soil is drought prone. More turf-type rye grass will get the lawn off to a fast start. More Kentucky bluegrass will produce that show lawn. Opinions of many experts and regional consideration also play an important part in making up a seed mixture.
Many good packaged lawn seeds we a combination of a mixture and a blend, A blend is a combination of varieties from one species, Characteristically, a blend is between a regular mixture and a straight. Resistance to particular diseases are somewhat improved and there is a look of consistency in texture and color, Seed containers that announce something like “an all-bluegrass mixture” are technically blends.
Measures of extra-quality seeds
Almost every state has a program of seed certification. Technically, “certified” seed only guarantees varietal purity. In other words, If the label says ‘Certified ‘Adelphi’ Kentucky blue grass,” the contents of the bag are guaranteed to be ‘Adelphi’ Kentucky bluegrass.
In most states certified seed also ensures higher overall quality. Fewer weed and and other crop contaminates, as well as inert filler guaranteed.
“Percent fluorescence” is a special rating of perennial rye grass. It was discovered that annual rye grass secreted a fluorescent substance when it was germinated on white filter paper. By contrast, the improved, turf-type ryes secrete none of this substance.
A simple way to test for contamination of improved rye grass is to germinate a sample on filter paper. If there is any fluorescence when exposed to ultraviolet light, the presence of annual rye grass (or a hybrid of annual and perennial rye grass) is established, To date, only the Manhattan Rye grass Growers Association requires this test of quality to be indicated on the seed tab, by calling the fluorescing seedlings “Other crop”.
Germination to establishment: how long?
It will be repeated several times on this website that post-seeding care, especially watering, is the single most important factor in deciding the success or failure of a seeded lawn, The trick is to water enough to keep the soil moist, but not so much the soil washes away. That delicate nurturing period,when watering can be a several times-a-day chore, extends between the time the seed is sown and the point when the grass becomes established. You might wonder how long this period will last? The answer to this question depends on the type of grass, Its rate of germination, and initial growth, and the daily temperature, To illustrate this, we conducted an experiment. Four grasses were sown the same day: ‘Manhattan’ perennial rye grass, ‘Merlon’ Kentucky bluegrass, ‘Fortress’ creeping red fescue, and common bermuda grass. Actually, the rate of germination surprised us. The ‘Manhattan’ rye-grass came up In less than five days. The others were also faster than expected. This extra fast germination was probably due to an unexpected heat wave during the first week that sent temperatures into the mid nineties, Seed invariably germinates more slowly in the cool temperatures of late fall or early spring.
Your new Lawn
A beautiful new lawn can have a dramatic effect on a home or building. Landscape plantings are accentuated, and they’re strong lines of walls, driveways, and sidewalks are softened by an expansive grass.
With a goal of a lush, green lawn in mind. It is easy to hurry through the initial steps of establishment but nothing could be more unfortunate. Your first decisions and procedures will be most important to the future of your lawn.
Answers to questions like which grass should I plant. Do I want to sow seeds or use sod, sprigs, stolons or plugs. How will I water. All should be thought out in advance of any labor. It’s a good idea to look through this entire website before beginning work. A little forethought will save you a lot of future headaches.
Ten steps toward a new lawn
We have seen many different ways of getting from bare ground to a new lawn. Some people simply spread seed over their existing ground without preparing the soil. Few lawns started this way succeed, or at the least reach the optimum appearance level. New techniques such as hydro mulching are becoming increasingly popular. Regardless of the planting method, success is still measured by long-term results.
Here we list the steps of site preparation that lead to a long-lasting, beautiful lawn. Following a logical order of events prevent costly backtracking and repetition of similar steps.
1. Test soil
2. Remove debris
3. Control persistent weeds
4. Rough grade the site
5. Add a high phosphorus starter fertilizer and lime or sulfur
6. Add soil amendments or topsoil if needed
7. Cultivate thoroughly
8. Install underground irrigation
9. Final grade the site and settle excavation areas
10.Lightly roll
Soil Sense
Much of the success of your lawn will depend on how you prepare the soil. It helps to remember that, unlike a vegetable garden where the soil can be rebuilt each year, Grass roots utilize the same soil year after year. Although most nutrient deficiencies can be corrected after the lawn has been established, changing the soil structure under growing grass is difficult and expensive. The time and effort you put into preparing the growing medium will be reflected in the health and beauty of your lawn for years to come. This is true for lawns grown from seed as well as vegetative planting such a sod. Even though sod has a little soil already attached, site preparation is still critical to success.
Gardeners describe soil types in many ways heavy, light, clay, sandy, loamy, rich loam, poor soil, and lean soil. Scientists and horticulturist classify soil by the proportion of sand, silt, and clay they contain. These designations are based on the size of the soil particles, clay being the smallest, silt bigger and sand the largest. A soils texture is determined by the blend of these various particles.
For proper growth, plants need air in the soil, available moisture, and a supply of mineral nutrients. If soil has plenty of clay holding onto nutrients its no problem, but the small clay particles hold water, and leave little room for air. Squeezed into a ball, clay soil clings together tightly; water penetration is slow. Drainage is the main problem in clay soils the lack of which often results in suffocation of plant roots. You know you have a clay soil if it’s rock hard when dry and gummy when wet.
Sandy soils have lots of room for air, but moisture and nutrients disappear quickly. Water sinks right into sandy soil without spreading, and dries up in just a few days after watering. When sandy soils are squeezed into a ball, they quickly fall apart when the ball is released.
In between a sandy or clay soil and the one best for plant growth, is a loam soil. It contains a combination of clay, silt, and sand which retains nutrients and water while still allowing sufficient room for air.
Chances are your soil is not the perfect loam, in which case it would benefit from the addition of organic matter. Even if it’s an ideal soil, heavy foot traffic or perhaps construction activity around new homes can severely compacted, closing air spaces and restricting water and nutrients penetration. You see the effects of compaction in footpaths worn across the lawn.
Improve soil texture
The best way to make either a heavy clay soil or a light sandy soil into a substitute for a rich loam is through the addition of organic matter not just a little organic matter a lots of it.
The addition of organic matter – compost, peat moss, manure, sawdust, shredded ground bark – makes clay soils more friable and easier to work. Organic matter opens up tight clay soils,improves drainage, and allows air to move more readily into the soil. In light sandy soils, organic matter holds moisture and nutrients in the root zone. The more organic matter you add to a sandy soil, the more you increase the moisture holding capacity.
Enough organic matter should be added to physically change the structure of the soil to a depth of 6 to 8 inches – the area where most grass roots grow. The final soil mixture should be 30% organic matter by volume about 2 inches of organic matter mixed into the top 6 inches of soil is usually sufficient.
A common problem for many homeowners is determining the total amount of organic matter needed to amend the entire lawn area.
The type of organic material used depends a great deal and what is locally available. While decomposed barnyard manure and compost are very good, they often contain troublesome weed seeds. Peat moss is generally problem free and available, but also expensive.
Other types of organic materials commonly found in the south include peanut hulls, cotton screenings, shredded tobacco stems, and ground pine bark.
The first step – testing the soil
The first step in preparing any soil for a future lawn is to have your soil tested. Many state universities test soils for a nominal fee. In other areas it may be necessary to go to a private soil testing laboratory. Of the 12 Southern States all provide soil test through universities.
A soil test eliminates guessing the amounts of nutrients and lime to be added and often provides useful information om the soil’s texture. Some give specific recommendations, others supply instructions and how to interpret results and take appropriate steps. If you have any unanswered questions, consult your County Extension agent.
How to take a soil test
First of all, obtain any necessary forms and questionnaires from your local Cooperative Extension Service or private soil lab. Information supplied through these forms will assist the lab and making specific recommendations for your site. Typical questions are “How large is the sample area? Has fertilizer or lime ever been added? To what degree is the land sloped?”
To collect the soil he will need a clean non metal bucket or container, a soil sampler, garden trowel or spade, pencil and paper and a malleable container that will hold about a pint of soil.
To get reliable soil test results, you must take a representative sample. This means the soil should be gathered from 15 to 20 spots in anyone sampling area. Low spots, trouble spots, and areas with obvious oil type differences should be treated as separate sampling areas.
Soil samples should be taken to a depth of 6 to 7 in, ideally with a soil sampling tube. The hollow shaft of an old golf club or curtain rod will usually suffice. If you don’t have a sampler, dig a v-shaped whole 6 to 7 inches deep with a spade or garden trowel. Remove a half inch slice from the smooth side. Soil samples from one simply area should be mixed together thoroughly in the bucket. Allow to dry before proceeding.
Place about a pint of the soil in a sturdy carton or plastic bag, label it properly, and mail it to the soil lab. Record which each sample was taken. Also provide any additional information on the history of the land, if pertinent.
Preparation of the planting site
The amount of work necessary to prepare the soil prior to seeding or sodding obviously depends on its present condition. If you are lucky enough to have a rich loam soil and a proper grade, little may need to be done beyond thorough tilling, fertilizing, and raking. Usually though more work will be required.
To start with, clear all debris from the planting area. Rotting wood can cause low spots as it decomposes and can serve as a food source for termites. Stones and cement can damage tillers and other equipment.
It is also a good idea to determine the dimensions of your lawn with a tape measure. These figures will be useful later in the siding how much amendments to add to the soil.
Next, establish a rough grade by filling low spots and leveling hills. On most lots there are fixed grade point such as house foundations, sidewalks, driveways, and trees. When grading, both rough and finish soil must be distributed so elevation changes between fix points are gradual.
The ideal grade is 1 to 2% slope away from the house to avoid water drainage towards the foundation. There’s about a 1/2 to 4 drop per 100 ft a long string and a level will be useful in determining the slope.
If the slope is not made to order, rough grading should be done before topsoil or amendments are added. This will ensure good uniform soil to the depth of the roots zone once the soil has been corrected. If the original soil is acceptable but the grade is wrong, the top 6 inches should be removed, the grade corrected, and the soil returned.
In areas where underlying hard pan or heavy clay soils prevent proper drainage, drain tiles may need to be installed. If this is the case, consult a confident drainage contractor for advice. Drainage work should be done after the rough grade has been established, but before topsoil and amendments have been added for the final grade.
If soil is moved or placed around trees, take precautions not to disturb roots. Trees in the lawn deserve special care.
While working on rough grade, you should also begin thinking of ways to make later lawn care easier. Header boards and mowing strips accent landscaping lines as well as health contain vigorous grass species.
Once the grade is sloped the way you want it, add the organic material so the final 6 to 8 inches of soil is about 30% organic matter. If topsoil is replaced or added, spread half of it over the area and thoroughly till it in. This creates a transition zone between underlying soil and new soil. After you have done this, add the other half.
If you plan to install sod, keep in mind the final grade should be about 1 inch lower than the grade for a seeded lawn, so the side will fit flush against sprinklers and sidewalk. Next add starter starter fertilizer and if the soil test indicates, lime or sulfur. Thoroughly till the soil.
It is important to carefully mix the top 6 to 8 inches of soil. Make several passes with the tiller in opposite directions to ensure soil, organic matter and fertilizer are properly blended.
Once everything is mixed it’s time to install underground irrigation if that is what you have decided upon. Waiting until all the tilling is finished with will avoid potential damage the pipes.
Control weeds
You will save yourself time and trouble later on if you take steps to eliminate weeds now. There are several methods; most will take at least a month to be effective, and safe. Methyl bromide completely sterilizes soil but is very dangerous and should only be used by professionals.
Metham, known under the trade name Vapam, is a useful pre-plant fumigant that requires 30 days to pass after treatment before you can seed.
30 days delay before seeding
If time is not a factor, you can keep the prepared seedbed wet, allowing weed seeds to germinate, and then kill them with a contact herbicide. Or, allow the soil to dry and lately rake the surface to kill new seedlings as they emerge. Let the soil dry completely before watering again. If this is done three or four times, most of the weeds will be killed, leaving fewer weeds to compete with the grass seedlings.
Be sure to read the labels of all these chemicals carefully. Do not sow any seed until the chemicals have dissipated. Check to see if the soil is safe by planting some quick germinating seeds such as radishes. If they come up and begin normal growth, it’s safe to sow seed or law sod.
Be very careful around trees and shrubs. Many of these chemicals will kill them as well. Read the label.
Watering
There are probably more questions asked about watering than any other aspect of lawn care, and rightly so. As it is for any plan, water is one of the most basic requirements. Without it, of course you’re lawn would not survive.
Watering your lawn will be simple if there were set rules for each situation on exactly how much water to apply and how often, but there are too many variables. Your lawn water requirements depend on several things, the type of soil you have, the climate of your area, temperatures, wind velocity, humidity, the frequency of rain, the type of turf being used, and maintenance practices.
Even with all these particulars, rules do seem to surface upon reading many lawn books and University extension bulletins. After you have watered your lawn for a while, your own experiences and conditions will lead to some of these apparent rules.
It is important to understand that it could lawn watering program is dependent upon you. But getting to know your lawn through close observation and by understanding a local climate characteristics, you can begin to answer many of the important questions yourself.
How often should a lawn be watered
The answer to this question is simply, when it needs it. A lawn has to be watered when the soil begins to dry out, before the grass actually wilts. At that stage, areas of the lawn will begin to change color, picking up a blue green or smoky tinge. And even more evidence signal is a loss of resilience – footprints will make a long-lasting imprint instead of bouncing right back.
Soil moisture testers and coring tubes are other ways to check for adequate moisture. There two types of moisture testers – mechanical and electrical. The mechanical type, called a tension meter, has a porous tip and a water-filled tube. Water in the tube can be pulled out by dry soil. The suction created is measured on the gauge. Tension meters are left in place once installed. The electrical type operates on the principle that wet soil conducts electricity better than dry soil. A coring tube takes a plug of your lawn and the underlying soil. It allows you to see and feel the moisture level of your lawn soil.
How long your lawn can go between waterings depends on several things. Roots grow only where there is water. If you constantly wet the top few inches of soil, roots won’t venture any deeper. Eventually, the limited size of the root system will force you into watering more often. That means trouble, because frequent watering keeps the surface wet, ideal for weeds and diseases. If roots go deep into the soil, they can draw on a larger water supply and the lawn can go much longer between waterings.
Soil conditions can also affect how often you need to water. For example, 12 inches of loam soil will hold about an inch and a half of water, a sandy soil about half that much, and a clay soil twice as much. Lawns in sandy soil will need water more often than those in a rich loam, Lawns in a clay soil will need water less often, and it will have to be applied at slower rates to avoid wasteful runoff.
Different types of grasses have different water requirements which also affect watering frequency. Grasses are ranked according to their drought tolerance.
Local weather patterns are also important. Seasonal rain can play an integral part in a watering program. When it’s hot and windy, it’s obvious more frequent watering is required.
Watering during drought
In parts of the South blessed with ample rain, irrigation may only need to be supplementary. In fact, around New Orleans for instance, some areas receive so much water that drainage is the big problem.
In Northern parts of the South, cool season grasses like Kentucky Bluegrass or Fescue, usually go dormant in the hottest month of the summer, returning to full vigor and cooler for weather. If you want to keep your cool season grass green in summer and you have started a water and program in the spring, continue it throughout the summer. It’s a long does does go dormant, let it let it stay that way. Too many fluctuations between dormancy and active growth can weaken a lawn.
In drier parts of the South like sections of west Texas, periods of drought or common. Here are some tips on water some tips on using water efficiently during drought periods.
1. Do not apply fertilizer to lawns when drought conditions exist.
2. Mow your grass higher and less often. However, don’t let it grow a third more than it’s recommended mowing height.
3. Reduce weed competition.
4. Irrigate without runoff the root zone depth and only when your lawn shows the need.
These tips are not normal lawn care practices. Under a system of survival irrigation, lawn may develop a spotty, thin appearance. Another alternative, although drastic, is to let the lawn die out altogether and replant with a more drought resistant turf when suitable weather returns.
Rain gauges are also helpful by knowing how much rain has fallen, you can tell how much supplemental water is needed. Don’t be misled by light drizzle that supply very little soil moisture. Watering right after a light shower, however may be an effective way of reducing water use.
How much water does a lawn need?
To keep grass roots growing deeply, the soil should be moisten to a depth of about 6 to 8 inches. They should take between 1 and 2 inches of water over the lawn surface. Depending on the weather and the soil type, the average lawn will deplete this amount of water in about 1 week. To tell if the water has gone down that deep, wait 12 hours and check with a soil sampler. Or, simply poke screwdriver into the ground. If it penetrates about 6 in without much resistance, the lawn is usually wet enough. Water should be applied as uniformly as possible, and no faster than the soil can absorb it. Avoid applying so much at one time that it results in wasteful run out. If this occurs, divide your watering into time intervals. Sprinkle until the soil can’t take anymore and stop for 20 or 30 minutes to allow for absorption. Continue until the desired amount has been applied.
What time of day should the lawn be watered?
This question has been answered in many ways, not all of them correct. Some suggest that afternoon watering causes sun scald out of the grass blades. This has proven to be false. Other suggest that moisture left on a lawn overnight from a late afternoon or evening watering promotes disease. In both cases these statements, need to be qualified.
First of all, there are several disadvantages to afternoon watering. At that time, evaporation caused by the wind and sun are at a maximum. Also, less of the water applied is actually made available to the lawn. Wind can disrupt sprinkler patterns, causing poor coverage. Local water consumption is usually highest in the afternoon which can result in low water pressure. Keep in mind too that drought symptoms are more evident in the afternoons and evenings. These symptoms can be induced by the higher temperatures and winds typical of that time of day, or do not always an indication of water stress. Often the grass will regain its color as temperatures and winds subside.
Whether or not afternoon or evening watering promotes disease is still under some debate among experts, but it shouldn’t cause any uncertainty in your watering program. Most lawn become wet at night naturally by dew. Cultural practices such as proper fertilizing, regular dethatching, and mowing at the recommended heights will do more to prevent disease than watering at times other than the afternoon. If you feel a wet lawn at night is increasing disease problems, water in the early morning rather than the evening. This will save water and your lawn will have less moisture at night.
Early morning, then, is not ideal time to water, but the but the answer to the question when still remains and the answer is water when the lawn needs it.
Watering new Lawns
There’s a different set of rules for watering a newly seeded or sodded lawn. Sprinkling is, at the least, and every day requirement. The germination of seed or the knitting of suicide to new soil often require water and more than once a day. We’ve discuss the lawn watering detail earlier.
Portable sprinklers
As we said previously, you have to understand your lawn’s requirements and signals. It is equally true you must be very familiar with your sprinkling equipment. Whether you choose a reliable, portable sprinkler, or an automatic, underground system, the rates at which the water is applied and the pattern of water distribution will vary. Automatic systems if properly designed and installed, are usually more precise and predictable. If you do choose to water with portable sprinklers, look over the many types with a skeptical eye, and the thought for uniform coverage and a minimum water waste.
There are many types of portable sprinklers, so consequently, there are many patterns of water distribution. Even individual sprinklers of the same type and have completely different patterns. Without knowing this, a very conscientious waterer can end up with over and under watered sections of lawn. This produces uneven green and brown areas, and unnecessary weeds and disease. Along with knowledge of soil and climate conditions, sprinkler patterns and water distribution a very important aspects of watering.
The container test
There’s an easy way to measure sprinkler water distribution. Set up a grid-like pattern of small containers on a section of the lawn. The grid pattern may change for different types of sprinklers, but it’s a good idea to start with a straight line of containers, extending them at set intervals, from close to the sprinkler head, to just outside the reach of the water. Turn the sprinkler on at the pressure you would normally operate for a set time and then record the amount of water deposited in each container. This will give you a good idea of the sprinkler pattern, as well as the amount of water distributed.
Realizing that a lawn needs about an inch or so of water per week, you could easily tell how long a sprinkler should be run into what degree the pattern should be overlapped for efficient watering.
We tested 15 of the major types of sprinklers and measured their patterns of water distribution using the testing method described previously. It is important to repeat that there can be variations between sprinklers of the same type, especially those made by different manufacturers. It is best to check your own sprinkler to be certain of his distribution and pattern.
The most inefficient sprinkler tested was the stationary fan type. Rates of water accumulating in the containers varied from 8 inches an hour in one spot, to 8 inches an hour just 4 feet away, to almost nothing very close to the sprinkler head. There was seemingly no predictable pattern that could lead to proper overlapping and efficient watering. However, to label the fan type sprinkler useless is unfair. As long as the water distribution is known, they can be valuable for spot watering or as a supplement to other types of sprinklers.
We also tested the popular oscillating arm sprinkler. Many believe the sprinkler deposits maximum amounts of water near the sprinkler, the decreased quantities towards the periphery as the arm moves further from vertical. We found this to be true of older models, but discovered a different story when we tested a newer model from a different manufacturer. The new sprinkler stalls momentarily when the arm is farthest from vertical, that’s depositing more water near the periphery of the pattern to even out the distribution. This demonstrates the need to test each individual sprinkler.
A third model tested was the whirling head type. It deposited the largest amount of water close to the sprinkler and decreasing amounts at greater distances from the source of the spray. When this type of sprinkler is used without overlapping, water distribution is uneven. With a 50% overlap, its efficiency is increased and the sprinkler becomes quite useful. Combining a little knowledge gained from experimentation and an observant eye, setting up a watering schedule with a portable sprinkler can be quite easy.
Get to know your lawn
As you become more adept at observation, you will become the watering expert for your lawn. By paying attention to your lawn signals, a regular watering schedule will unfold, but with you in charge, compensating for changes in weather or in the passing of the seasons.
Certain areas of the lawn will consistently signal water need before others. It may be an area on a slight slope facing south with maximum sun that always dries out first. Or it may be an area exposed to more wind than others. These spots are clues, and will mark the time to begin watering. Hand-watering isolated dry areas can sometimes extend water in a day or two.
Developing a water-efficient lawn
There are other cultural practices besides watering deeply and less frequently that will increase your watering efficiency. Two major problems that result in poor water penetration are thatch and compacted soil. If bad enough, either one can actually repel water, causing wasteful run off. Regular dethatching and aerification is recommended to increase water penetration, provide air in the root zone, and aid in nutrient uptake. Following recommended mowing heights or mowing even higher in hot summer months will also conserve water.
Proper fertilization is another important factor in efficient watering. Poor fertilization invites competition from water hungry weeds, and reduces the wear-and-tear capacity of the lawn. On the other hand, over-fertilization promotes vigorous water hungry growth of the lawn which can cause that’s to develop.
Underground irrigation
The interest in underground irrigation system seems to increase every year. The advantages over portable sprinklers are many, but the most obvious is the convenience of not having to consistently move sprinklers. In the majority of cases, they are also more efficient. Sprinkler heads apply predictable amounts of water over the exact area, eliminating the most objectionable grievance of portable sprinklers – uneven water distribution. An underground system combined with an automatic timer can even water while you’re away from home. It’s important to stress that a poorly designed or poorly installed underground system will be just as bad or worse than a portable sprinkler.
The one disadvantage of an underground system is the initial cost of materials and installation labor. But along with the increased interest in such systems, materials have become cheaper as well as easier to install. Galvanized steel and copper pipe have gradually given way to PVC plastic pipe and flexible polyethylene pipe. Heavy wrenches required to fit metal pieces together have been replaced by easy to use glue. Manufacturers have spent time and money in the production of simplified directions for home owners who wish to do the work themselves.
Information for home installation
It is impossible to describe in full detail information how to install an underground irrigation system. Materials differ greatly between manufacturers and there are too many variables for each specific site. What we’ve done is outline a typical underground installation. We indicated where the problems might arise, how they can be solved, and the different types of equipment that can fit ideally to specific situations.
Choose the manufacturer as well as a supplier carefully. Consult neighbors who have underground systems, talk to irrigation specialists, nursery men, or your County Extension agent to get help in selecting a trade name that will best suit your needs. You can then either write the manufacturer, or obtain the available installation aids catalogs from a local distributor.
One thing to realize at the very start and its importance cannot be overemphasized, is the manufacturer of the system being installed will be your most helpful friend. Most will provide completely illustrated, easy to follow instructions that are useful not only for the individual who wants to do the job himself, but also to anyone who wishes to contract the job out to an irrigation specialist.
Begin with a plan
After you’ve decided to put in an underground irrigation system, you need to decide how much of the work you’re going to do yourself. Companies specializing in irrigation can often install a system within hours, and then no more than a few days. Do-it-yourself installation may take several weekends. If the sprinklers are to be installed prior to planting a new lawn, the clutter of equipment may mean nothing. If an established lawn and maybe bother some, or even damaging. Cost is also a consideration. If you are handy with tools and have this time, it is much cheaper to do it yourself.
However you decide, remember the importance of choosing reliable specialist to assist you.
Begin your sprinkler system with graph paper, a soft lead pencil, a dime store compass, and a measuring tape. A plan on paper will help you install a better system. Besides, a carefully prepared plan helps when ordering materials, makes it easier to get advice from your garden center, irrigation specialists, or hardware dealer and serves as a record as to where the pipelines are laid.
Make your plan complete. A good plan is actually a bird’s-eye view of your property drawn to scale, preferably 1 inch equal in 20 ft. With that scale, you should be able to fit all important details on a 8 and a half by 11 inch piece of paper. It should show all construction and landscape features which could affect the design and installation of the sprinkler system. This includes shrubs and trees, paved areas, fencing, and less apparent objects such as mailboxes, raised planters, and buried drainage or power lines. If significant, is also helpful to know prevailing wind direction, sun and shade areas, steep slopes, as well as high and low spots in your landscape.
Draw the plan for both the front and back yards, even if you plan to install the system in only one area. You may want a similar system in another area at a later date. If you want to include sprinklers for trees and shrubs, indicate any water sensitive or a specially thirsty plants on the plan. You can get a free planning template here.
Important number – gallons per minute
One of the most important aspects of building a successful sprinkler system is determining the available water in gallons per minute. This is usually abbreviated GPM. The best way to find available GPM is to use a gauge. A GPM gauge automatically compensates for friction loss, pipe corrosion, and similar variables. Most sprinkler suppliers loan a gauge upon request.
It is possible to deduce available GPM without the use of this gauge. First, check the water meter size. It should be stamped on the meter itself. If it isn’t, ask your local water company. Common meter sizes are five eighths of an inch, three quarters of an inch, and one inch. Next determine your static water pressure with a gauge measured in pounds per square inch.
These gauges are much more commonly available than the GPM gauge. When figuring static pressure, use an outside faucet connected to the service line, and have all inside water turned off. Last, find out the size of the service line from your meter to the house.
Types of pipe
Ease of handling, assembly, durability, flow characteristics, cost and availability are reasons to recommend PVC pipe and solvent – welding fittings as a piping for sprinkler installations. Schedule 40 PVC is normally sold in 20-foot lengths. Use the heavy duty schedule 40 for all pressure holding lines. To save money and materials, used Class 200 or class 315 pipe for all lateral lines that will never be required to hold constant pressure.
Flexible polyethylene pipe is also acceptable and very easy to use in sprinkler lines, but it cannot handle enough pressure to be used between the water meter and control valves. The advantage of the flexible pipe is that you you’re not restricted to straight lines. Poly pipe comes in 100 foot or 200 foot rolls and can be cut with a knife. Fittings are inserted into the pipe and held in place with stainless steel clamps tightened with a screwdriver or wrench.
Sprinker heads
While a wide variety of sprinkler heads are available for every conceivable application. Most residential lawns and gardens can be best served by using a adjustable, pop-up lawn sprinkler heads with full, half circle, and quarter circle watering patterns. When not in use, the head rests flush in the ground, out of the way of mower and foot traffic. It is important to remember that each sprinkler head is designed to discharge a specific number of gallons per minute over a given radius, and that each head requires a certain water pressure in order to achieve its design throw.
When adjusting the arc of a sprinkler head, check specifications to see that this does not drastically affect the rate at which the water is applied to the lawn. This could change your watering strategy.
Square pattern and low precipitation rate heads are also available. Square patterns are useful in narrow areas such as side yards and parking strips. Use low precipitation heads in areas where runoff is a problem due to a sloping grade or clay soil.
Besides pop up spray heads there are also impulse sprinklers which could be useful in large areas. However these can be rather difficult to use efficiently in smaller lawn. In center areas of a lawn, especially if wind is a problem, consider pop-up sprinklers with rotary action, dispersing water in large drops rather than a spray.
Drawing sprinkers on your plan
Set your compass to match the radius of the sprinkler heads according to the scale of your plan. Lightly draw in quarter inch circles wherever a 90 degree angle is shown within the area to be sprinkled. Next, draw the half head circles normally located adjacent to paved areas, buildings, and property lines.
Finally, fill in center areas with full circle symbols. There are a variety of arcs available. Many installers have found one or more of these areas to be much more convenient for fitting a sprinkler spray to a regular shaped areas. Over spray can be a problem. Here are a few good rules to follow.
1. Overlap the outer third of a sprinkler head spray radius, more if when is a problem.
2. Cut back the radius of your circles to accommodate design, but do not attempt to stretch it.
3. Design your system so that water is applied from the outside perimeter inward toward the center.
4. Experiment with various full and part circle head combinations and spacing patterns, until coverage is complete with no potential dry spots.
5. Water lawn and planted areas separately, unless sprinkler heads are designed to deliver optimal amount of water to the plants
Control valves
Your irrigation system will have to be divided into circuits which operate one at a time. They will probably not be enough available water pressure to water the entire lawn at once. Each circuit will have a separate control valve. Together all the control valves compose what’s called the manifold, which should be placed in a convenient location, usually next to a doorway and out of reach of the sprinkler spray. One manifold each will be needed for both the front and back yard. Draw the manifold in your plan. Try to conceal the manifold with some sort of cover or box as a plumbing is seldom attractive. An anti-siphon valve will prevent back flow of water into the house supply. There is sometimes required by local ordinances and are always a good idea.
Use the three figures obtained earlier (water meter size, static water pressure, size of service line) to determine the gallons per minute available to anyone circuit. Group the sprinklers into circuits, making sure the total GPM discharge does not exceed what you’ve just determined is available. It’s alright to have less, but try to keep each circuit about the same. Do not mix different types of sprinkler heads in one circuit. Take your time planning or different circuits, it may take two or three tries to get it right.
Whenever possible, group sprinkler heads by the requirements of an area. In other words, water sloping areas with low precipitation heads and windy areas with heads that apply and larger drops of water.
Valve and pipe size
Draw the piping in from the valves to the sprinklers. Avoid going under sidewalks and driveways if possible. Split the flow whenever you can so smaller size pipe can be used. Pipe size is determined from the maximum number of GPM that can flow through. For example of a circuit requires 16 GPM, available 1 inch PVC should be used. However, if the flow down the line is reduced to 8 GPM, the pipe size can be reduced to three quarters of an inch.
Pipe size from the control valve to the supply line should be the size of the largest valve in the system. If the distance between supply line and valves is over 100 feet, go one size larger.
Pressure change due to friction or slope
Two factors can influence the water pressure available to operate a sprinkler head. One is friction caused when water moves through the pipe. The other is a change in elevation between the water source and the sprinkler head.
Pressure loss due to friction is depending on the length and size of the pipe and the amount of water traveling through. It is accumulative and can be determined in PSI per 100 ft of pipe. Increasing the pipe size will increase flow and decrease friction.
If your irrigation system runs up a slope, add almost half a pound per square inch of pressure that you need for every foot of rise. If it runs down a slope subtract this amount for every foot of fall.
Check your plan
At this point you should be ready to begin installation of your underground irrigation system. In order to avoid costly problems, is it good idea to have your plan checked by a specialist before you begin. The retail dealer who supplies your equipment may offer help, in which case you may have it checked free of charge. Otherwise, it would be money well spent to engage the services of an independent installer.
Installation
Installation specifics will vary between manufacturers. They should be spelled out in detail in printed material available from dealers, distributors, or the manufacturer.
Riser height and backfill
Before connecting the sprinkler heads, use a ruler to determine the proper length of the riser. This will depend on whether it’s old or new lawn, whether a new lawn is seed or sod, its eventual mowing height and the height reached by the nozzle of a pop up sprinkler. If the risers are too long, the sprinkler head may be damaged by mowers, and it’s too short, they may become clogged with soil. Make them longer if sod will be installed, shorter if you are starting a lawn from seed.
Several types of risers are available to make this easier. A cutaway riser has selections of thread in short increments along its entire length. Small 1/2 inch pieces are easily cut away one or two at a time until the proper height is reached. Flexible risers require proper height adjustment, but if by accident the sprinkler head is kicked or hit by a mower, they flex rather than break. Repairing underground damage to PVC can be troublesome.
Test your system first, then replace the soil in the trenches and water it thoroughly to settle it in. Repeat as necessary until the trenched area is level with the surrounding soil. This will avoid high and low spots.
Automatic timers
For complete automation in lawn watering, you may want to install an electric timer and automatic valves on your system. Most manufacturers also supply timers.

Locate the timer where it can be protected from sun and rain and close to an electrical outlet; a garage is ideal. It’s positioning may influence the location of your control valves.
Final grading
Final grading should be done just prior to planting. The smooth bed can be ruined if it I left too long.
Take time ranking and smoothing the area to be sure it is free of rocks and as level as possible. Connecting high and low spots later will be difficult. In large areas a chain or wooden drag can be helpful.
Installing a seed lawn
Carefully rake and level the seedbed. Use a steel rake for final grading and removal of stones. In large areas, a piece of chain link fence a wooden drag can be especially helpful in leveling. Take your time on this step it will prevent scalping from lawn mowers and water puddles from occurring later on. Correcting the grade after the lawn is established as difficult.
Sow the seed. Grass seed can be sown with the same equipment used to spread fertilizer if the spreaders are calibrated to distribute seed at recommended rates. As long as you don’t drastically over or under seed, the results will be the same. Lawn seed can also be sowed by hand. Regardless of the seeding method, divide the seed into two equal lots. The second lot should be seated at right angles to the 1st, covering the entire lawn area in each pass. When using wheeled spreaders it may be necessary to touch up edges by hand.
Lightly rake the seed in and roll. To ensure good contact between seed in soil lightly rake the entire area with a rake. Be sure not to rake the area too roughly, this can redistribute seed or ruin the final grade. Hard raking can also bury grass seed too deep. A depth of 1/8 of an inch to 1/4 of an inch is usually considered good for seeding.
Add mulch. Mulching the area where grass seed has been sown will hasten germination by keeping soil moist, while also providing protection for young seedlings. On slopes, mulching can be useful in preventing soil erosion while watering.
Many materials can be used as mulches. Here, a thin layer of peat moss is applied with a pete applicator available at local rental yards. In areas that have a abundant rainfall or strong winds, heavy or mulch is advisable. Although wind is often a problem with lightweight mulches, various types of knitting or available to solve this problem.
The most covering should be thin enough to expose some of the soil of the seedbed. Never completely cover the area. If light mulch is such as Peter used, follow it up with a rolling. Rollers are usually available on loan from nurseries, or at rental yards. Roller should be 1/4 to 1/2 full of water to provide the necessary weight.
Water thoroughly. Improper watering probably causes more failures in a newly seeded lawn than any other one factor. For even germination, the very top layer of soil must stay constantly moist. A thorough soaking is required after sowing and then as many as three to four light sprinkling by hand each day until the young grass is established. How long establishment takes depends on the variety of species of grass, the time it takes to germinate, its rate of growth, and daily weather. More frequent watering will be required if it’s hot or windy.
Water with a fine spray or mists type nozzle to minimize moving soil or washing seed away avoid standing water.
Stringing the area with brightly colored flags will warn neighbors and children, but not necessarily dogs to stay off.
Weed control
You will save yourself time and trouble later on if you take steps to eliminate weeds now. There are several methods; most will take at least a month to be effective, and safe. Methyl bromide completely sterilizes soil but is very dangerous and should only be used by professionals. Metham, known under the trade name Vapam, is a useful pre-plant fumigant that requires 30 days to pass after treatment before you can seed.
30 days before seeding
If time is not a factor, you can keep the prepared seedbed wet, allowing weed seeds to germinate, and then kill them with a contact herbicide. Or, allow the soil to dry and lately rake the surface to kill new seedlings as they emerge. Let the soil dry completely before watering again. If this is done three or four times, most of the weeds will be killed, leaving fewer weeds to compete with the grass seedlings.
Be sure to read the labels of all these chemicals carefully. Do not sow any seed until the chemicals have dissipated. Check to see if the soil is safe by planting some quick germinating seeds such as radishes. If they come up and begin normal growth, it’s safe to sow seed or law sod.
Be very careful around trees and shrubs. Many of these chemicals will kill them as well. Read the label.
Final grading
Final grading should be done just prior to planting. The smooth bed can be ruined if it I left too long.
Take time ranking and smoothing the area to be sure it is free of rocks and as level as possible. Connecting high and low spots later will be difficult. In large areas a chain or wooden drag can be helpful.
Starting from seed
Regardless of the quick effect of sodding, certain pleasures are afforded to the person who chooses to start a new lawn from sprigs, stolons, or seed. Few colors are as bright yet as soft as young green grass. Growth occur so quickly that the feeling of actually growing something is more intense; the part you played seems more important. The person who grows his own lawn feels more “The Gardener”.
To be sure that plant in your lawn from seed is a pleasant experience, you should become familiar with lawn seed, how it is packaged, mix, and the rates at which it is sown.
The time of year you seed is important. Cool season grasses such as in Northern parts of South, are best planted in late summer or early fall. Allow four to six weeks before the first frost so the grass can be established before the onset of cold weather.
Starting with vegetative forms
The warm season grasses which are most often used in the South, are usually planted by vegetative means such as sprigs, stolons, or sod. This is the case with St Augustine, Asia, and hybrid Bermuda grass. Common Bermuda and centipede grass, however often planted by seed. Sow seed of warm season grasses in late spring or early summer.
Cool season grasses can be sown in spring and warm season grasses in late summer, but planting at these times of the year send young grass right into weather less than ideal for active growth. Cool season grasses may go dormant in warm weather, warm season grasses go dormant when it turns cool. Weeds may not follow the schedule and can take over before your new lawn is established. Never sow in the heat of summer – watering at that time will become almost a full-time job.
Sprigs, stolons and plugs
In the Southern United States, where warm season grasses predominate. Starting a lawn by sprigs, stolons, or plugs is a common method of planting. Because most of the warm season grasses spread horizontally by above-ground stolons or underground rhizomes, sections of the plants can be evenly spaced over an area. In time, they will cover, forming a beautiful lawn. This planting method is not practice with most cool season grasses.
With some grasses, hybrid bermuda grass for example, planting vegetatively with sprigs, stolons, plugs, or sod is the only possible way because they do not produce viable seed.
The first step to any one of these methods is properly prepare the soil according to the instructions.
Sprigs and stolons
A turf specialist at the University of Florida has this to say about sprigs. A sprig is an individual stem or piece of a stem of grass. Regardless of what a sprig is technically, rhizome or stolen, it has at least one load or joint it has the potential of developing into a grass plant and spreading. Spreading is simply the planting of individual sprigs at spaced intervals. A suitable sprig should have roots or at least two to four nodes from which fruits can develop.
Bermuda, zoysia, and bentgrass are commonly planted by this method.
Sprigs can be bought by the bushel or obtained by buying sod and pulling it apart into separate sprigs. If bought by the bushel, they probably will be shipped to you from the point of origin in bags or boxes.
The soil should be ready to plant when they arrive. Keep the sprigs cool and moist until planting time, which should be as soon as possible. Only five minutes of sunlight can damage sprigs in plastic bags. Even when stored properly, sprigs decay rapidly.
There are several ways to plant sprigs. One method is to cut 2 to 3 inch deep furrows in the seedbed, placing the sprigs in the furrows up to 12 inches apart. The furrows can be dug with a hoe and spaced from 4 to 12 inches;, again this depends on the rate of coverage you would like. Close spacing results and more rapid coverage, but naturally involves more material and labor.
If you use the furrow method, place the runners up against one side of the furrow so that any tufts of foliage are above ground, and the light colored runner is below ground. Firm the soil around it and level the area as well as possible. A light rolling will help form soil around runners and aid in the leveling.
It’s best to begin working with slightly moist soil, but this often causes more problems than it’s worth. In any case, don’t let the stolons dry out. Water sections as you plant them, and keep the soil constantly moist until the runners are established.
Another method of planting sprigs is to place the runners on the soil at desired intervals and lightly press them in with a notched stick.
A third and faster method is called stolonizing, broadcast sprigging, or shredding. The sprigs are broadcast over the area like a mulch, either cut into the soil with a sprigging disc or covered with a mulch or soil and rolled. Peat moss, ground bar, or sawdust work as well as mulches – about one quarter of an inch is satisfactory.
Plugs
Plugging is exactly what it sounds like – small circles or squares of sod are plugged into the soil at regular intervals. Square plugs are cut from sod with a shovel or knife, while round plugs are cut with a special steel plugger similar to a bulb planter. The plugs are placed in corresponding size holes spaced 6 to 12 inches apart in the lawn area. The plugs are then tamped and watered. Although plugs do not dry out as fast as sprigs, keeping the surrounding soil moist is still very important. Coverage from plugs will be slower than sprigging, but less plant material is damaged or lost.
St. Augustine and centipede grass are usually cut into plugs 3 to 4 inch in diameter and planted on one foot centers. Bermuda and zoysia grass plugs are usually 2 inches in diameter and planted on 6 or 12 inch centers. Spacing determines the time it will take to achieve complete coverage.
When plugging or sprigging, it is usually necessary to top dress with soil or organic matter after the initial establishment to level the lawn. Irrigation and rain can cause the soil to wash out between springs or plugs, yielding an uneven and bumpy lawn.
The best time to plant plugs and sprigs and stolons is just prior to warming days of spring. The onset of warm weather will provide optimum growing conditions for warm season grasses.
Sod Lawns
Sod is turf that is grown commercially, cut into strips, and lifted intact with a thin layer of soil held together by the rhizomes, the roots, or knitting. Installing a sod lawn is much like laying a carpet, with the objective of reestablishing the grass roots in well prepared soil.
In the southern and southwestern United States and even coastal areas of the north, plugging or sprigging is the common way to install a lawn. Bermuda grass is available as sprigs, sod, or seed. St Augustine grass from stolons, two inch sod plugs, or sod ; zoysia grass from splits or two inch plugs, centipede grass is available at seed, sprigs, or two inch sod plugs.
Compared with establishing a lawn by seed, sprigging, or plugging, laying sod deals much quicker results. A sod lawn can be functional in as little as two weeks, although some restraint should be used until it’s roots are properly knitted with the soil. This can be checked by lifting corners. Under proper conditions, sprigging of Bermuda grass make cover in 8 to 10 weeks. Plugging of St. Augustine can take 3 months to cover and a seed lawn requires 14 to 21 days for germination, followed by a 6 to 10 weeks establishment prior to use.
While timing of a seeded lawn is critical, a sod lawn, weather permitting, can be installed almost any time of year. Ideal times to put inside are late summer and early fall for cool-season grasses, late spring and early summer for warm season grasses. Cool season lawn can also be installed in early spring
Sod can also be installed in areas where a seed lawn may be difficult to establish due to traffic, or on a slope where erosion can be a problem.
The one drawback of sod is the initial cost in the labor involved, which can be substantial compared to a seed lawn. But what price tag can you place an instant results?
Select a high-quality sod
The first step is to select a high-quality, healthy turf of a grass well adapted to your area and site.
Sod of cool season grasses is generally available in the same varieties or blends of varieties that can be obtained in seed mixes. Mixtures usually include both shade tolerant and sun loving grass types.
Sod usually comes in rolled or folded strips from 6 to 9 feet long and 2 feet wide it should be moist but not too wet, and definitely not too dry. If the sod delivered is high quality, it will be uniformly green. Don’t buy any sod with poor color or yellowing.
The thickness of different varieties of sod may vary, but generally it should be about 3 quarter to 1 inch thick. If the sod is too thick, it will root slowly or poorly, too thin, and it will dry out too fast. It should not fall apart easily when handled.
Some states have a sod certification program to ensure the sod is labeled correctly, and is relatively free of insects, weeds, and disease. If certified sod is not available, make sure the sod you buy originates from a reputable sod farm.
Important – prepare the soil
Before the sod is delivered the soil should be thoroughly prepared according to the instructions previously mentioned. Don’t be fooled into thinking that because sod already has soil attached, that soil preparation is not important. It is just as important as it is for the establishment of a seeded lawn.
After delivery
Sod is usually delivered on pallets to the site where it is to be installed. Once the sod arrives, it should be laid as soon as possible. Do not leave it rolled or stacked on pallets more than one day in hot weather. If its cool, sod can remain rolled for two to three days. Store in a cool, shaded area. Be sure to keep the soil on outer pieces moist.
Watering the new sod
Proper watering is the single most important step in the establishment of a sod lawn. Moisture the soil before laying sod. It’s best to water a day or two in advance to avoid laying the sod on muddy soil. After the sod is in place, it may be necessary to water every day for up to 2 weeks until the roots have sufficiently knitted with the underlying soil. If a large area is being sodded, it’s better to work in sections. Lay the sod in one area, roll and water, then move on to another area. This is much less risky, especially if the weather is warm.
After watering, lift a corner of the sod to be be sure the soil underneath is moist. An inch of water over the area is usually sufficient to wet soil and sod. Keep soil moist at all times but not so wet that it is saturated.
The edges of the sign strips and borders along pass and driveways will be the first to dry out and the last to knit with the soil.
Installing sod on a slope
When laying sod on a slope, start from the lowest point and move uphill. Always lay the sod so it runs perpendicular to the slope and stagger the joints to avoid excess corrosion during irrigation or rain.
Pegging or staking sod strips maybe desirable on steeper slopes. Three pegs 6 to 8 in long will usually hold each piece of sod in place. Place one peg near each corner and one in the center. Pegs should be driven through the sod vertically, not perpendicular to the slope, near the top edge of the strip.
Mowing and aerification
The time of the first mowing will depend on a species planted. Newly turfed areas should be mowed as soon as the grass is two and a half to three inches high. It should be clipped frequently enough to prevent removal of more than one third of the growth at one mowing.
Aerifying a newly laid sod lawn two or three months after installation will help in the formation of a strong, well rooted turf. Some lawn growers aerify even sooner. Moisture, air, and fertilizer can then pass through the turf more easily, into the root zone where they are needed. FAQs are here